 The support group started right on time. About halfway through, apprehensively, I made my way to the podium. I felt the calling and it was my turn to confess. With all eyes on me, the walk down the middle aisle seemed miles long. I stood behind the podium, straightened the microphone, cleared my voice more than once, grabbed both sides of the podium, and gave in a higher power.
1. Go to www.craigslist.org.
2. In the upper left corner of the Craigslist homepage, click on my account.
3. If you already have an account, log into it. If you don't have an account, create one on this same page. You'll want to create an account so you can manage your listings easily, including reposting them once they expire after seven days. Also, without an account, there will be extra time-consuming steps to publish each ad. Lastly, be aware that you will be asked to verify your account through two steps. One, email verification, and two, via your cell phone. This process keeps everything and everyone legitimate should a real problem arise.
4. Once you have created an account, or have logged into your account, click on the postings tab.
5. On the right-hand side is the "new posting in" drop-down menu; choose where in the U.S. you want to attempt to sell your item and click go. Ninety-five percent of the time I sell locally to the San Francisco Bay Area where I live. However, for example, I have a piece of art done by a listed WPA artist in the Seattle area, so I'm attempting to sell it in the SeaTac region.
Naturally, I'll have to ship the item if sold. I use the USPS Priority Mail option because the boxes are free, delivery time is 2-3 days, and comes with $50 insurance. You can buy additional insurance, send it certified, track it, etc.
6. Next, you'll be taken to the screen to choose what type of posting you are constructing. I choose "for sale by owner". Business owners will want to choose "for sale by dealer". Once you make this selection, click on continue.
7. On the next screen, choose the exact area in the for sale section thereof want to list your item. I mostly sell in the collectibles section. Once you make your choice, click on continue.
8. On the next screen you will choose the sub-location that fits best for selling your item and click continue. The San Francisco Bay Area is divided into six areas. My item will appear on the main SF Bay Area site, but also in the North Bay/Marin section because that's the geographical area closest to me.
9. On the next screen you will choose the exact city that you live in to give the buyer an idea of how far they may have to drive to pick the item up. You can bypass this step if you want. Once you make your choice, click on continue.
10. On the next screen you will begin building your ad:
- First, choose how you want to be contacted. Be wary of listing your phone number or personal e-mail address. I use the "CL mail relay" option to keep myself anonymous until I feel comfortable with the purchaser.
- Next, type in the most descriptive ad title you can envision at or under 70 characters.
- Add in a price.
- Add your zip code. - Next, type in a full description of your item. Again, be very descriptive and use keywords that you know someone looking for an item like yours is likely to type into a browser to find.
- Next, type in or choose to post details, such as make/manufacturer, model name/number, dimensions, the language of posting, and the item condition.
- Next, you can choose whether or not to include a map on your listing.
- Be sure not to click on the box that says "ok for others to contact you about other services, products or commercial interests". This way you won't be spammed mercilessly. You will be spammed, but only ruthlessly.
- Once you have completed these steps, click on continue in the bottom right corner.
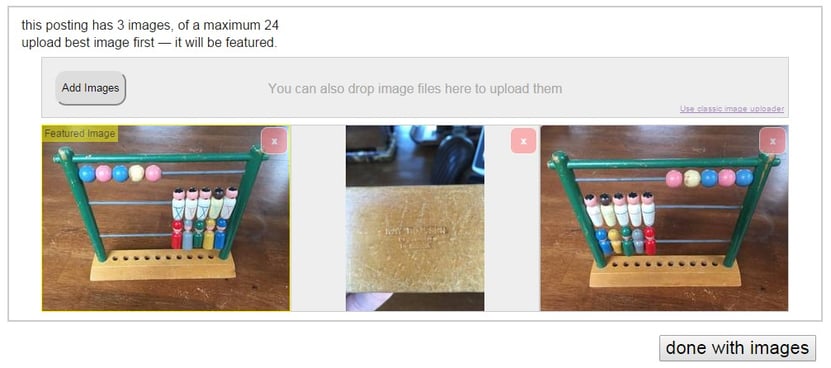
11. On the next screen you will be taken to the section where you can ad images. Images are non-negotiable. No one will buy from you without seeing pictures of what they may be purchasing. So, take your digital pictures and place them on the desktop of your computer. Click on add images or just drag and drop into the add images window. The more distinctly different pictures the better, but the limit is 24. Also, the picture in the first position is the feature pic and the one that will be used in search results. Drag and drop the best picture into the first position. Once you have uploaded all of the pics you want to be listed with the item, click on the images.

12. On the next screen, assuming you feel comfortable with your listing, click on publish on the right-hand side.
13. The next screen is a confirmation that your posting has been published. Good job!
14. Now, it's only a matter of minutes before someone contacts you to discuss your item, and if all goes well, arrange to see it. If you agree to meet and you don't have a store, be very careful and if possible, don't do it where you live. I choose a highly trafficked public place to meet. Let someone know with whom you are meeting, when, and where, and consider letting them know when you've left for the appointment and when you've concluded the appointment. Better yet, read the Craigslist warnings here.
14.5 Not all of us deal in cash-only transactions. This step is for merchants accepting checks that want to avoid a returned check problem. Check Guarantee mitigates the risk of a returned check. Click below to learn how we guarantee that all revenue in the form of check payments falls to your bottom line.


